mount raw disk in VirtualBox

先贴结论

vboxmanage internalcommands createrawvmdk -filename "c:\physical.vmdk" -rawdisk "\\.\PhysicalDrive2"
RAW host disk access VMDK file c:\physical.vmdk created successfully. 

起因很简单,我装了一个 portable 的 Archlinux,打算可以即插即用。但是后来发现,一个是新买的本子屏幕太差了(浪费钱),另一个是 PC 机性能严重过剩,同时多系统之间交互也很麻烦,想想还是虚拟机大法好。但是可怜的硬盘空间没剩多少了,装个系统二十个 G 就没了,如果能直接从 U 盘启动就好了。

搜了一下发现是可行的。可以用前面贴的命令生成一个执行裸硬盘的 vmdk 文件,然后在虚拟机里加载就可以了。照着示例找到了磁盘名称,发现是这样的:。这是什么鬼嘛,就算我不大懂 Windows 也明白一个设备是不会在同一个目录有两个名字的。
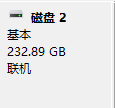
最后通过各种神奇的办法找到一个方法:wmic diskdrive list brief

Caption                              DeviceID            Model                                Partitions  Size

Samsung SSD 850 EVO 250GB            \\.\PHYSICALDRIVE0  Samsung SSD 850 EVO 250GB            4           250056737280
JetDrive Transcend SCSI Disk Device  \\.\PHYSICALDRIVE1  JetDrive Transcend SCSI Disk Device  7           250994419200
Cenda C5 USB Device                  \\.\PHYSICALDRIVE2  Cenda C5 USB Device                  3           250056737280

可以很明确的找到设备的名称了。

然后塞到前面的命令行里面。

C:\Program Files\Oracle\VirtualBox>vboxmanage internalcommands createrawvmdk -filename "c:\physical.vmdk" -rawdisk "\\.\PhysicalDrive2"
VBoxManage.exe: error: Cannot open the raw disk '\\.\PhysicalDrive2': VERR_ACCESS_DENIED
VBoxManage.exe: error: The raw disk vmdk file was not created

纳尼?是我姿势不对吗?然后我就放弃了。

后来某一天又想起来。试了一下用管理员身份运行。

RAW host disk access VMDK file c:\physical1.vmdk created successfully.

就搞定了……然后还有要注意的是在 VirtualBox Manager 里面打开的时候也要用管理员身份。

再一次败给了 Windows 的奇怪设定。

现在还有一个问题,就是 Windows 启动的时候先看见那块硬盘是不固定的,也就是说这回的 PhysicalDrive2 到了下一回可能就是 PhysicalDrive1 了,我还得重新生成这个 vmdk 文件。目前没找到什么方法能更明确地指定一块驱动器,不过还好我也不经常重启。

js 调试重定向终端输出

最近在手机 app 里调试网页, 看不到 console.log 的输出, 很是不方便, 从网上搜到了这个方案:

if (typeof console  != "undefined")
    if (typeof console.log != 'undefined')
        console.olog = console.log;
    else
        console.olog = function() {};

console.log = function(message) {
    console.olog(message);
    $('#debugDiv').append('<p>' + message + '</p>');
    if (message instanceof Error) {
        console.olog(message.stack);
    }
};

console.error = console.debug = console.info =  console.log

第一段重命名原有的 log 函数, 并且允许多次执行.

第二段是把需要输出的内容写到某个 div 里面. 这里我加了判断, 如果是个异常打印调用栈.

vuejs 实时监控类页面实现

基本功能

首先创建代表单点的组件:

Vue.component('instance', {
    template: '#v-template-instance',
});

模板:

<script type="text/x-template" id='v-template-instance'>
<div :id="instance.display_name"
     :class="['per-instance', status, hotStatus, highlight]"
     @dblclick="openConsole()"
     @click="showPopover()"
     :title="instance.display_name">
</div>
</script>

其中,status等都是计算属性,通过当前点的数据计算出对应的class,并自动更新。

状态改变

载入时进行索引:

        created: function () {
            insIndex[this.instance.display_name] = this;
        },

当有数据更新时,通过索引更新数据,计算属性的值就会自动更新。

判断连接状态使用了如下计算属性:

        computed: {
            isActive: function () {
                t = this.time2number(this.instance.last_active);
                return t && t + busy_limit > this.$root.now;
            },
        }

其中,last_active存了该节点上次活跃时间,busy_limit为有效时间。通过当前时间与上次活跃时间的差判断活跃。如果在这里直接使用$.now()作为当前时间,vue是不会追中这个值的,也就是说这个计算属性的值不会随着$.now()的改变而改变(虽然可以声明不缓存此计算属性的值,但只对js调用有效,对dom无效)。在这里,我定时更新最上层组件的now值,再在这里进行计算比较。

定时更新now的值:

            ready: function () {
                var self = this;
                this.intervalId = setInterval(function () { self.now = $.now(); }, 10000)
            },
            beforeDestroy: function () {
                clearInterval(this.intervalId);
            },

搜索

通过一个计算属性来标识这个点是否匹配搜索:

        computed: {
            ifMatch: function () {
                if (!(this.$root.search)) return false;
                var toTest = [data......];
                var search = this.$root.search;
                for (str in toTest) {
                    if (toTest[str] && toTest[str].indexOf(search) >= 0) return true;
                }
                return false;
            },
        }

最上层组件的数据绑定:

<input v-model="search" type="text" placeholder="..." id="searchbox">

在组件上可以使用class,style,或者v-show来控制搜索结果的显示。

P.S.

改完一共少了一百多行代码,代码结构也清晰了,还是值得的。

Arch + XFCE install

Base files 

Download Arch iso image and reboot. Follow the installation guide to install. The file is in /root (Online version).

Boot loader

Boot loader is a little troublesome.

Here I use syslinux. Install syslinux in the new system. Only one-line command is needed to config syslinux: syslinux-install_update -i -a -m (for Arch only). Remember to check /boot/syslinux/syslinux.cfg to see whether the partition for root is set correctly.

Now you can reboot.

Network

Network is not enabled by default. Enable and start systemd-networkd and dhcpcd in systemd, and you should be able to use network.

pacman -S networkmanager

Enable and start NetworkManager in systemctl. Now you can use nmcli to manage your wireless network: nmcli c -a .

Also wifi-menu could be used. Remember to stop networkmanager when using wifi-menu.

Sudo

pacman -S sudo

You can install base-devel. It contains many useful tools, including sudo.

Remember to add yourself to sudoers via visudo.

Yaourt

Yaourt is used to install AUR packages. Add these lines to /etc/pacman.conf :

[archlinuxfr]
SigLevel = Never
Server = http://repo.archlinux.fr/$arch

And, pacman -Sy yaourt .

yaourt has been deprecated.

pikaur

Install base-devel.

pacman -S base-devel

install pikaur.

git clone https://aur.archlinux.org/pikaur.git
cd pikaur
makepkg -si

XFCE

pacman -S xfce4

Locate

pacman -S mlocate

Now you can use locate.

Input method

Here I use fcitx, and rime as input method engine. fcitx-configtool is used to config fcitx.

pacman -S fcitx-im fcitx-configtool fcitx-rime

Add following lines to .bash_profile :

export GTK_IM_MODULE=fcitx
export QT_IM_MODULE=fcitx
export XMODIFIERS=@im=fcitx

Sound

alsa + pulse

pacman -S alsa-utils pulseaudio pulseaudio-alsa

ALSA is set muted by default. Run following command to unmute:

amixer sset Master unmute    

Trackpoint

Ref

pacman -S xorg-xinput

xinput set-prop "TPPS/2 IBM TrackPoint" "Evdev Wheel Emulation" 1
xinput set-prop "TPPS/2 IBM TrackPoint" "Evdev Wheel Emulation Button" 2
xinput set-prop "TPPS/2 IBM TrackPoint" "Evdev Wheel Emulation Axes" 6 7 4 5

Fingerprint

pacman -S fprintd

Add following line to /etc/pam.d/<auth_type>

auth      sufficient pam_fprintd.so

 <auth_type> could be system-local-login, sudo, and so on.

One inconvenient thing is that, you cannot skip it when you do not want to swip your finger.

Flashplayer

For Chromium: yaourt -S chromium-pepper-flash

It download chrome.rpm and extract pepper.

Chrome include pepper itself.

For FF: pacman -S flashplugin

It's old version 11.2.

Has change. Check Arch wiki.

Fan

(for thinkpad only)

modprobe -r thinkpad_acpi

modeprobe thinkpad_acpi fan_control=1

cat /proc/acpi/ibm/fan

echo [command] > /proc/acpi/ibm/fan

saltstack笔记

先安装 salt-master salt-ssh

vim /etc/salt/roster 编辑minion列表

salt-ssh "dev001*" state.sls salt.minion

可以通过salt-ssh给没有minion的机器执行命令,比如安装salt-minion(当然这里salt.minion要自己写)。

salt-key -A 接受key

salt-key -L 检查key情况

salt执行语句格式:salt <hostname> module.submodule <para>

e.g. salt "dev001*" state.sls repo.install

注:<hostname>可以使用规则匹配。state是模块名,sls是子模块名,并不是文件名。repo.install这里指向的是<salt-base>/repo/install.sls,如果指向的是文件夹那么就是这个文件夹下的init.sls文件。加-v可以显示jid。

saltutil.refresh_pillar 刷新pillar缓存

salt-run jobs.lookup_jid <id> 根据jid查询job执行情况。jid是按时间命名的。

pip reverse dependency

运行一个工具时,其先后要求包pyparsing版本>=2.0.1和<2,即安装2.0.1版本后出错要求<2,安装1.5.7后弹错要求>=2.0.1。我猜测是因为此工具依赖某包A,A依赖pyparsing。此工具依赖低版本pyparsing,依赖任意版本包A,包A默认安装了最新版本,包A的最新版本依赖高版本pyparsing,由此导致了冲突。然而pip不像apt那样智能会自动降级,它只是在安装的时候自动安装依赖而已,安装完以后就什么都不管了,删除或者降级的时候完全不关心依赖。解决问题的关键就是找到这个包A。

pip包内有记录正向依赖信息,但pip不提供反向的依赖查询。网上搜到了如下方法:

import pip
package_name = 'pymongo'
rev_dep = [
    pkg.project_name for pkg in pip.get_installed_distributions() if package_name in 
    [requirement.project_name for requirement in pkg.requires()]
]

这条语句写得非常棒,值得学习。

事后证明我的猜想是正确的,包A即cliff。

Debian通过包内文件查找包名

经常有需要某个文件但是不知道哪个包里有的情况.

1. dpkg -S filename

优点: 快, 不需要额外安装东西.

缺点: 只能找找已经安装的包里的文件.....

2. apt-file search filename

优点: 能找未安装的包里的文件.

缺点: 需要额外下载数据库. apt-file update 更新数据库.

3. auto-apt run ./configure

会根据configure输出信息自动安装包(貌似还是要手动输密码, 不过我可以扫指纹).

和apt-file共享数据库.

优点: 全自动.

缺点: 好卡.

参考

忽略deb包依赖

情景: 安装peazip. 其deb包依赖包libgmp3c2, 但此包已经更名, Debian源内没有此名的包, 并且我也安装了更名后的包libgmp10. peazip使用没有问题, 但apt中包peazip状态为b, 不能安装新的包或升级包.

在apt中将peazip设定为hold或keep均不能解决问题.

目前的解决方案是创建一个空的包并命名为libgmp3c2, 安装后满足peazip的依赖.

创建空的包配置文件:

equivs-control package_name

然后编辑该文件, 修改包名, 版本, 依赖关系.

生成deb包:

equivs-build package_name

然后安装这个包就可以了.

当然, 这个工具是可以建立真正的deb包的.

参考

抓wow英雄榜数据

抓了 角色名\ 种族\ 职业\ 等级\ 装备等级\ 战场等级\ 专业.

https://github.com/craynic/wow_armory

总的来说用python写就不用关心细节了,方便得很。

遇到几个问题。

1. 最开始我是设置没有等待,抓失败了就等个随机的时间然后继续抓。结果貌似是被当成 DDoS 了……经常一大排的失败。然后我改成每次抓之前都等1秒,就很很顺畅了。

2. 用配置文件方便很多,用的时候就不会要改的找半天找不到了。

3. python 的编码。外部文件用的基本都是 utf-8,我在 mongodb 里用的也是 utf-8(这样比较直观)。但是 python 内部通用的是 unicode。在用 json 解析之后会自动把编码转成 unicode。如果是 unicode 编码的,字符串的类是 unicode,否则就是 str。unicode = str.decode('utf-8')  str = unicode.encode('utf-8')

4. battle.net/api 居然还会看 ua。我用浏览器打开如果服务器忙的话会给一个 json 并有 reason:'Internal server error.',爬虫返回的就只有 500 的状态。

xrandr + xfce 双屏幕 panel 位置问题

今天把台机的显示器扯过来了<-.<-, (看片可以看高清了~口水ing)

先是设置xorg

xrandr --output LVDS1 --auto --output VGA1 --left-of LVDS1

效果是显示器放到笔记本左边. 右边同理.

然后我发现 xfce 的 panel 也都跑到左边, 可我习惯在笔记本屏幕上看到他们, 所以想把 panel 移过来.

多次尝试后发现 panel 总是会在左边的屏幕上. 应该是 xfce 的设置问题.

然后在 xfce 的 settings editor 里面找到了.

Settings Editor -> xfce4-panel -> panels -> 你要搞的那个面板 比如 panel-0 -> output-name = 你要出现的那个屏幕 比如 LVDS1

命令行方法  xfconf-query -c xfce4-panel -p /panels/panel-0/output-name -s 'LVDS1'

xrandr --output 有 --primary 选项. xfce4-settings-editor 的 displays 也有设置 primary 的选项. 但是貌似都没有效果.

'Run Program...' 窗口出现的屏幕是当前活动窗口所在的屏幕.

另外, arandr 是个 xrandr 的 GTK 前端, 懒得自己写就用这个搞很方便, 还可以生成脚本.